
 Flutter - 引擎调试bug到提交PR实战 🐞
在上一篇 Flutter - 引擎调试(iOS篇)🛠 中,我们已经知道了如何去编译调试引擎,今天就来说一说我从调试到提交 PR 的过程吧。
# 一、背景
在 Flutter 官方仓库发现了别人提的一个 issue,是关于苹果移动光标的特性功能,先给大家看看该功能的官方演示吧
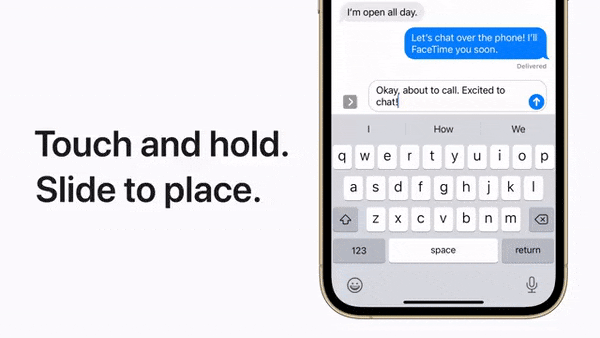
issue 链接: [iOS] Hold and drag spacebar does not move cursor when obscureText is true. (opens new window)
问题复现的动图如下:
issue 问题总结:
Flutter 的 TextFormField 或 TextField ,在obscureText 的初始值和切换值的这两种情况下,长按空格并拖拽时可移动光标这一特性,出现了有别于原生控件的表现,具体如下:
| 行为 端 | 获得焦点 obscureText=false (当前状态: 明文) | 切换 obscureText=true (当前状态: 密文) |
|---|---|---|
| Flutter 的 TextField | 可用 | 可用 |
| 原生的 UITextField | 可用 | 不可用 |
| 行为 端 | 获得焦点 obscureText=true (当前状态: 密文) | 切换 obscureText=false (当前状态: 明文) |
|---|---|---|
| Flutter 的 TextField | 不可用 | 不可用 |
| 原生的 UITextField | 不可用 | 可用 |
可以看到,正常的表现应该是只要是明文,则该功能就可用,而密文时则该功能不可用,但是此时在 Flutter 端,该功能可不可用取决于获取焦点时是否为明文!
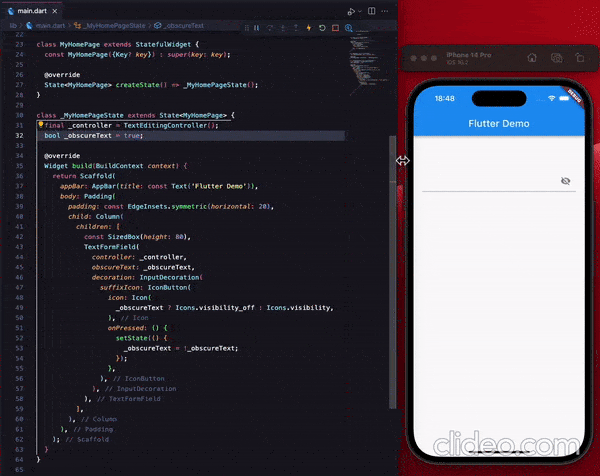
这里贴出 issue 中给出的示例代码:
import 'package:flutter/material.dart';
class MyHomePage extends StatefulWidget {
const MyHomePage({Key? key}) : super(key: key);
State<MyHomePage> createState() => _MyHomePageState();
}
class _MyHomePageState extends State<MyHomePage> {
final _controller = TextEditingController();
bool _obscureText = true;
Widget build(BuildContext context) {
return Scaffold(
appBar: AppBar(title: const Text('Flutter Demo')),
body: Padding(
padding: const EdgeInsets.symmetric(horizontal: 20),
child: Column(
children: [
const SizedBox(height: 80),
TextFormField(
controller: _controller,
obscureText: _obscureText,
decoration: InputDecoration(
suffixIcon: IconButton(
icon: Icon(
_obscureText ? Icons.visibility_off : Icons.visibility,
),
onPressed: () {
setState(() {
_obscureText = !_obscureText;
});
},
),
),
),
],
),
),
);
}
}
接下来我们一起去探索一下引擎源码,找到出现问题的根本原因。
# 二、探索
# 1、引擎准备
配置 .gclient,将 url 改成你自己 fork 的仓库的 git 地址
这样方便我们后续调试完成后,直接将修改的代码提交至自己仓库,顺带提
PR
solutions = [
  {
    ...
    "url": "git@github.com:LinXunFeng/engine.git@dd91363757dd2e8e4dc22d3be62741d461ceb005",
    ...
  },
]
关联调试源码的操作可在上一篇 Flutter - 引擎调试(iOS篇)🛠 中查看,加上篇幅限制,所以这里就不再赘述,本文重点是解决 issue 提及的问题。
# 2、查找病因
在引擎中,与 TextField 相关的类为 FlutterTextInputPlugin,在该类的所在文件中找到 obscureText 定义的常量 kSecureTextEntry
#pragma mark - TextInputConfiguration Field Names

static NSString* const kSecureTextEntry = @"obscureText";
搜索 kSecureTextEntry,发现了除 init 方法之外,仅在方法 configureWithDictionary 中以 kSecureTextEntry 做为 key 向 configuration 取值并将值赋予 secureTextEntry 属性
- (void)configureWithDictionary:(NSDictionary*)configuration {
  ...
  self.secureTextEntry = [configuration[kSecureTextEntry] boolValue];
  ...
}
因为移动光标的功能与是否明文相关,所以我们可以想到这个 secureTextEntry 必定是在哪里有被使用到。
如果我们把 secureTextEntry 相关的代码注释个遍去排查,这无异于大海捞针,该方式也过于笨拙,且明确告诉你徒劳无功,那怎么办呢?🤔
是的,重写它的 getter 方法,并打个断点
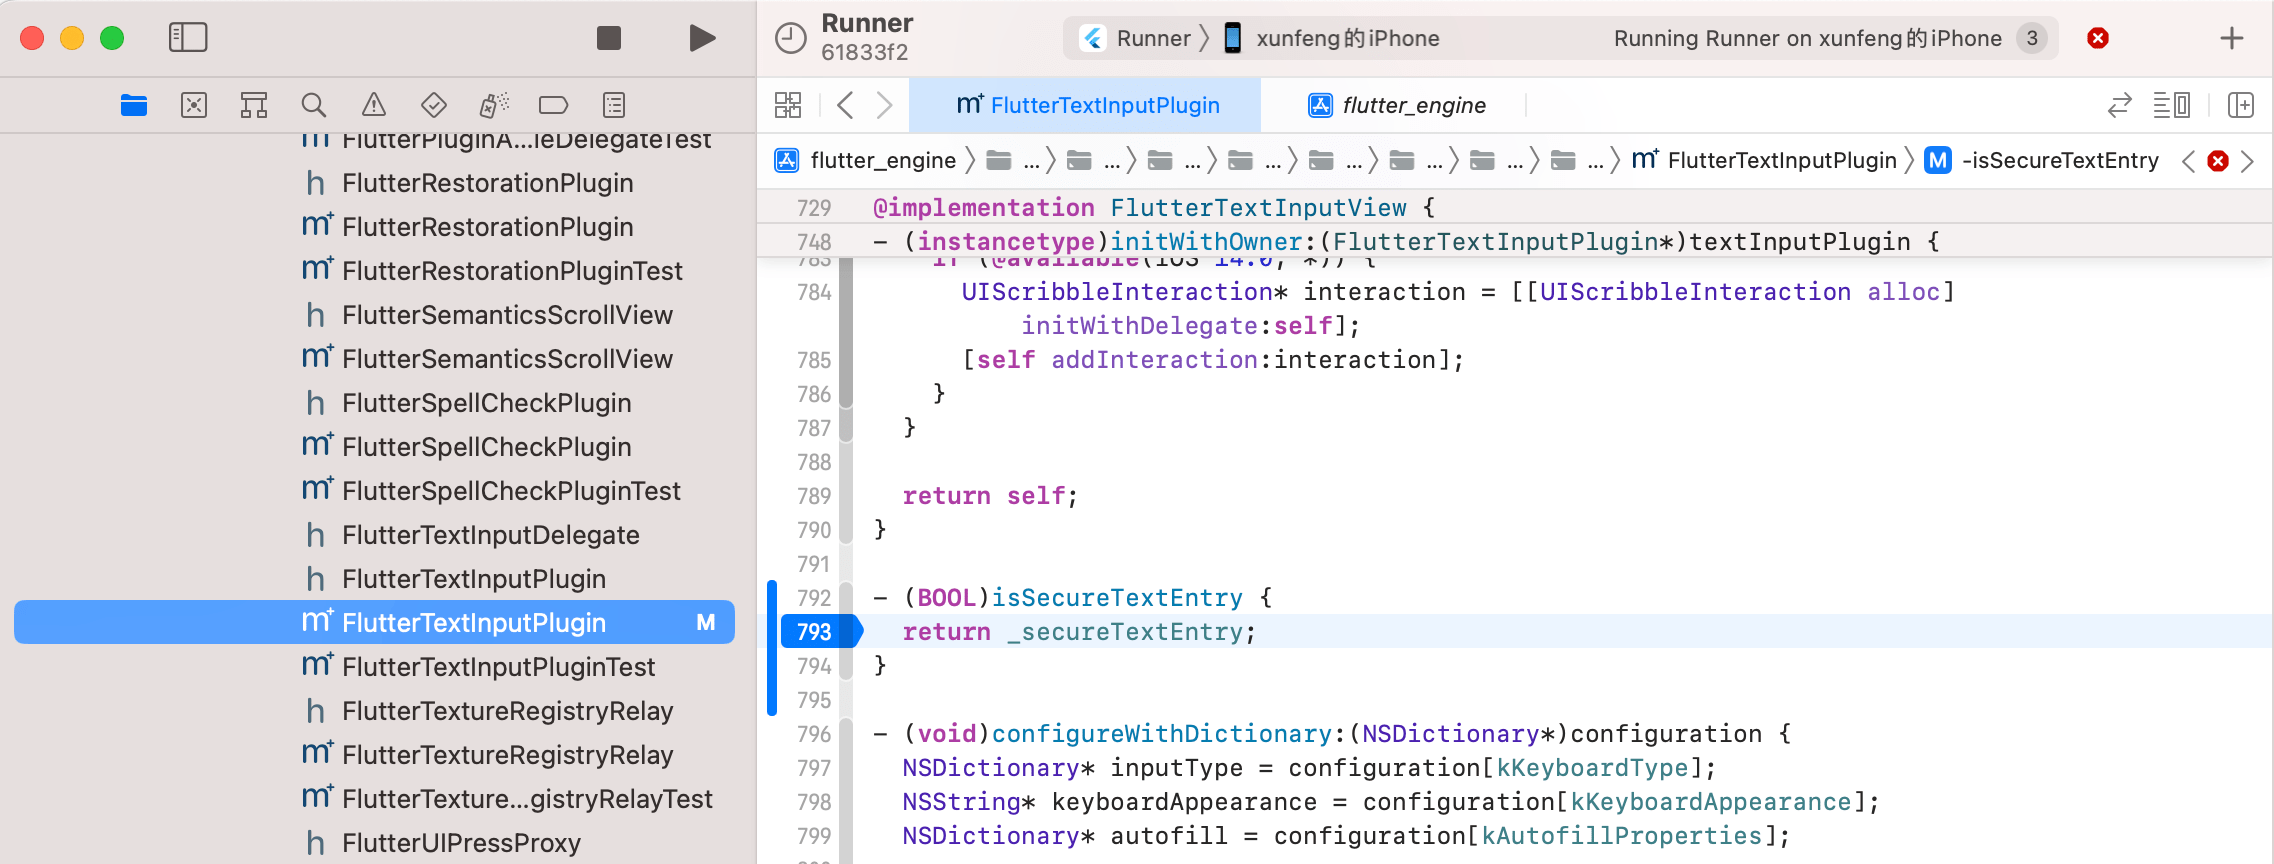
这里可别忘了先编译!
ninja -C ios_debug_unopt
点击输入框获取焦点,Xcode 来到断点处,注意看左边的调用栈
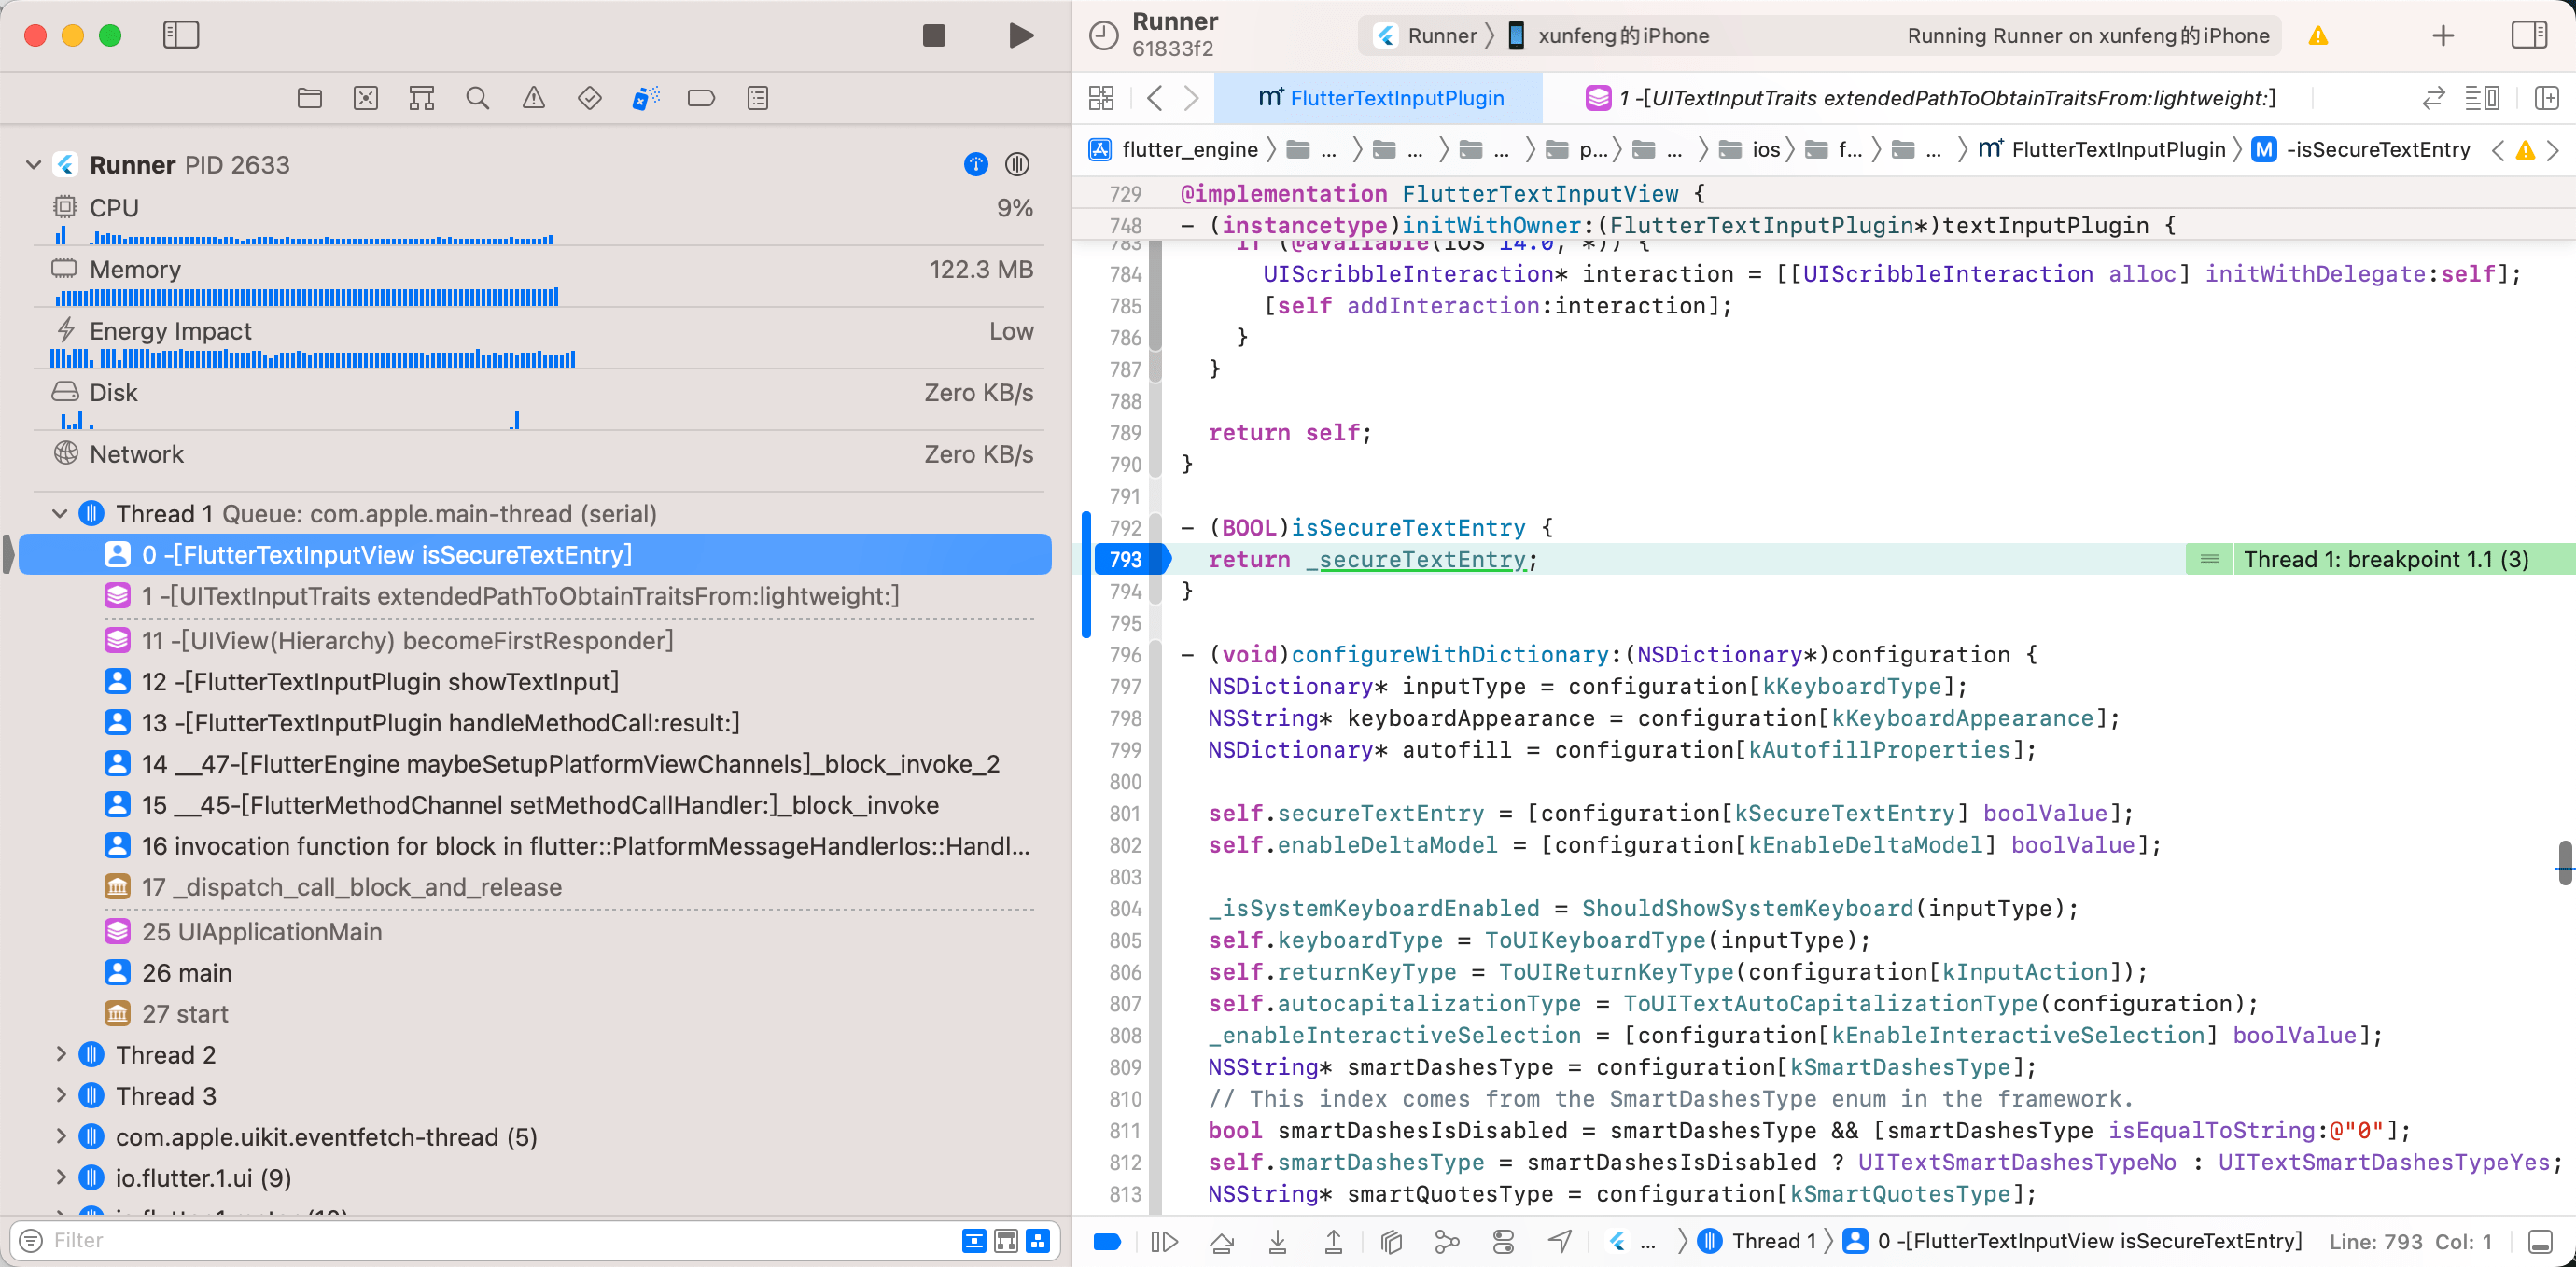
发现 isSecureTextEntry 是被系统调用的!
调用栈向下找,发现是 _activeView 成为第一响应者后间接触发的
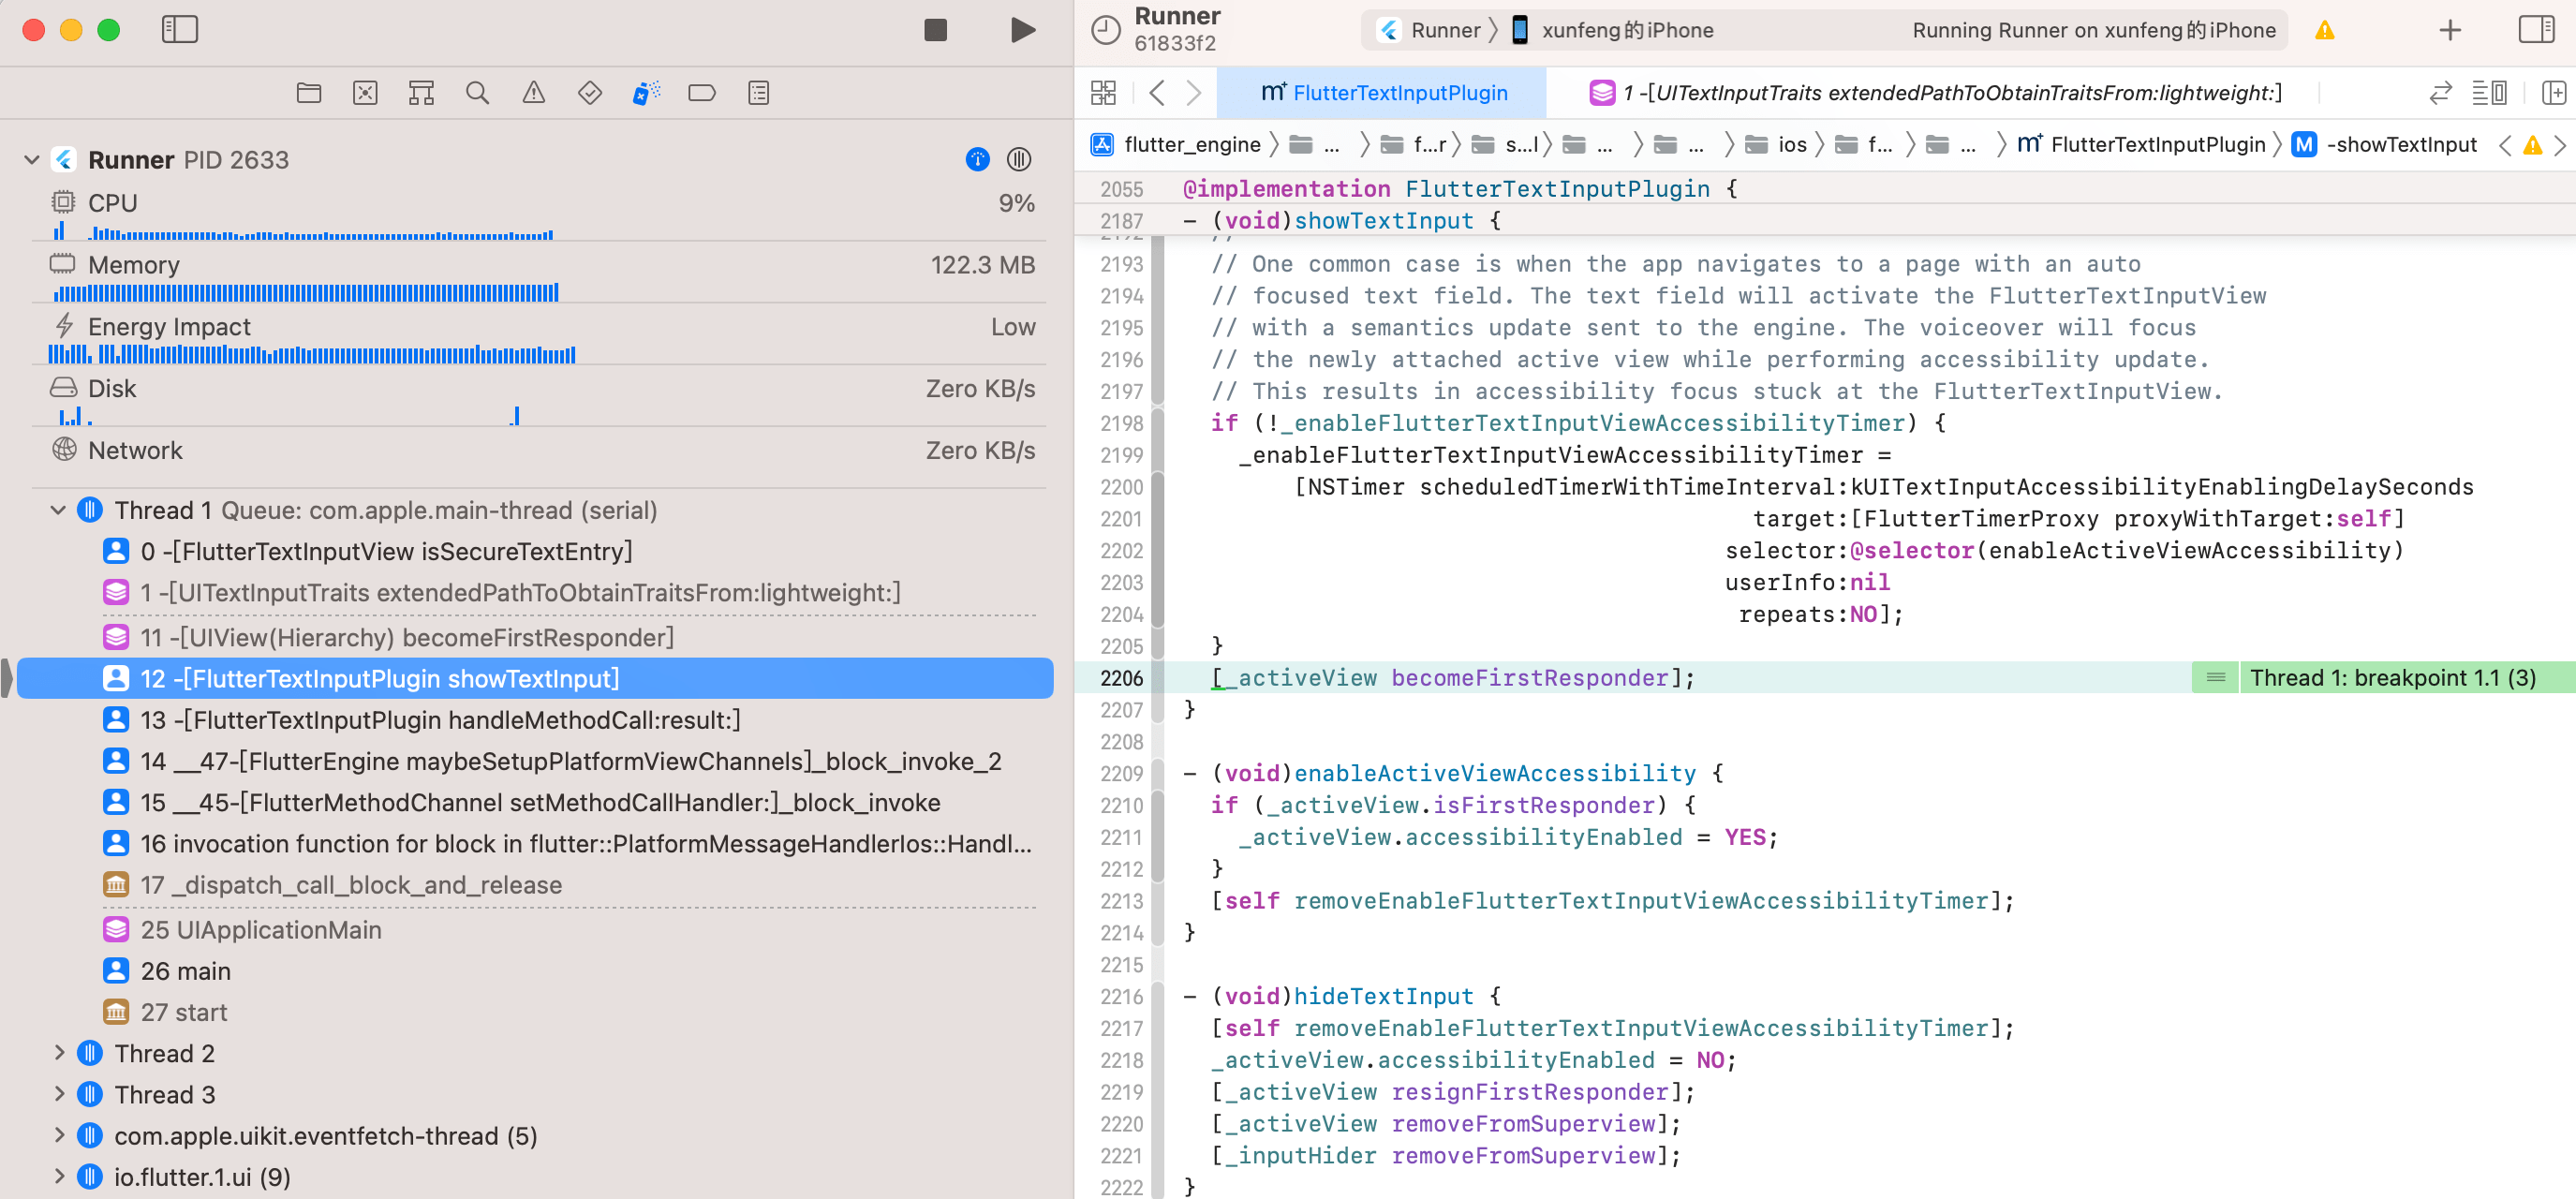
activeView 的声明:
@interface FlutterTextInputPlugin ()
...
@property(nonatomic, retain) FlutterTextInputView* activeView;
...
@end
FlutterTextInputView 的声明:
@interface FlutterTextInputView : UIView <UITextInput, UIScribbleInteractionDelegate>

// UITextInputTraits
...
@property(nonatomic, getter=isSecureTextEntry) BOOL secureTextEntry;
...
UITextInput -> UIKeyInput -> UITextInputTraits
@protocol UITextInput <UIKeyInput>
...
@end


@protocol UIKeyInput <UITextInputTraits>
...
@end


@protocol UITextInputTraits <NSObject>
...
@property(nonatomic,getter=isSecureTextEntry) BOOL secureTextEntry; // default is NO
...
@end
可以发现 FlutterTextInputView 最终遵守了 UITextInputTraits 协议,该协议声明了 secureTextEntry 属性,而该属性不仅决定着原生控件显示明文或密文,还控制着键盘是否可以长按移动光标。
现在来看一下 FlutterTextInputPlugin.mm 文件中的 handleMethodCall 方法,其是处理 Flutter 与引擎交互的 method channel 的方法
- (void)handleMethodCall:(FlutterMethodCall*)call result:(FlutterResult)result {
  NSString* method = call.method;
  id args = call.arguments;
  ...
  } else if ([method isEqualToString:kHideMethod]) { // TextInput.hide
    [self hideTextInput];
    result(nil);
  } else if ([method isEqualToString:kSetClientMethod]) { // TextInput.setClient
    [self setTextInputClient:[args[0] intValue] withConfiguration:args[1]];
    result(nil);
  } ...
}
TextInput.setClient: 这是在输入框获取焦点的时候与原生控件建立事务时传递的方法名,与之相对应的是 setTextInputClient 方法,在该方法内创建新的 FlutterTextInputView 控件,并赋值给 activeView
- (void)setTextInputClient:(int)client withConfiguration:(NSDictionary*)configuration {
  [self resetAllClientIds];
  // Hide all input views from autofill, only make those in the new configuration visible
  // to autofill.
  [self changeInputViewsAutofillVisibility:NO];

  // Update the current active view.
  switch (AutofillTypeOf(configuration)) {
    case kFlutterAutofillTypeNone:
      self.activeView = [self createInputViewWith:configuration];
      break;
    case kFlutterAutofillTypeRegular:
      // If the group does not involve password autofill, only install the
      // input view that's being focused.
      self.activeView = [self updateAndShowAutofillViews:nil
                                            focusedField:configuration
                                       isPasswordRelated:NO];
      break;
    case kFlutterAutofillTypePassword:
      self.activeView = [self updateAndShowAutofillViews:configuration[kAssociatedAutofillFields]
                                            focusedField:configuration
                                       isPasswordRelated:YES];
      break;
  }
  [_activeView setTextInputClient:client];
  [_activeView reloadInputViews];
  ...
  [self cleanUpViewHierarchy:NO clearText:YES delayRemoval:YES];
}
并在下图的方法调用栈内可以看到最后是调用了 addToInputParentViewIfNeeded 方法将 activeView 视图添加到 inputHider 视图上。
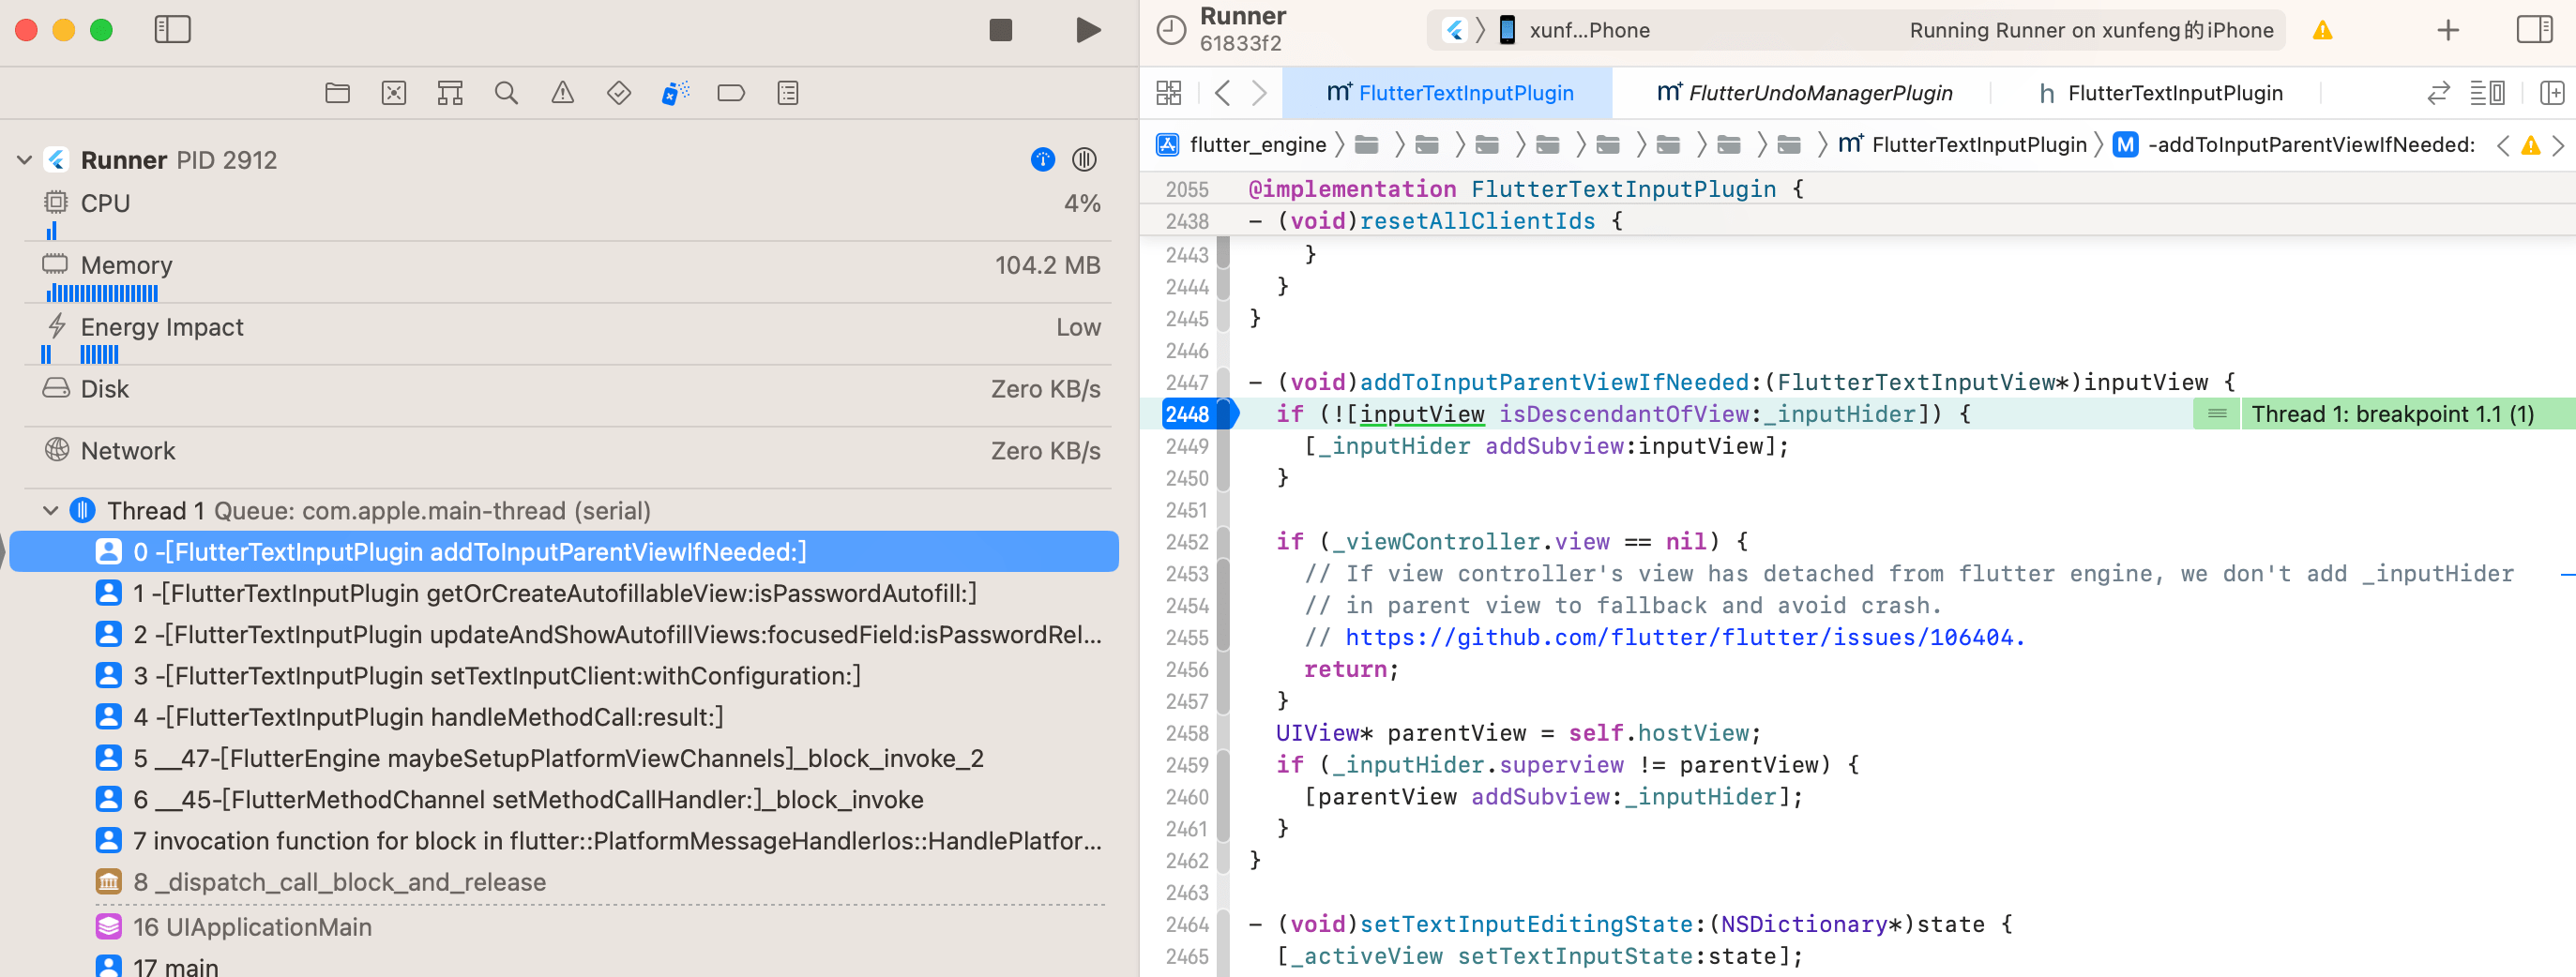
inputHider 视图也在该方法中被添加到 _viewController.view 上
- (UIView*)hostView {
  UIView* host = _viewController.view;
  NSAssert(host != nullptr,
           @"The application must have a host view since the keyboard client "
           @"must be part of the responder chain to function. The host view controller is %@",
           _viewController);
  return host;
}
TextInput.hide: 这是当输入框失去焦点的时候传递的方法名,用于移除当前的 activeView 视图 和 _inputHider 视图,对应的方法如下:
- (void)hideTextInput {
  [self removeEnableFlutterTextInputViewAccessibilityTimer];
  _activeView.accessibilityEnabled = NO;
  [_activeView resignFirstResponder];
  [_activeView removeFromSuperview];
  [_inputHider removeFromSuperview];
}
在此做一个小小的总结:
Flutter的TextField在每一次获取焦点时,引擎端会创建一个相应的FlutterTextInputView原生控件与之对应,并使用activeView来记录当前获取了焦点的那个控件,当失去焦点时,相应的控件会被移除和销毁。
断点放行后点击眼睛按钮,将输入框切换为密文,你会发现 isSecureTextEntry 的 getter 方法并不会被调用,这就是病因,此时虽然从 Flutter 的 TextField 的显示来看确实是有在进行明文与密文的切换,但是这只是 Flutter 处理后的显示结果,而在引擎端的 activeView 的 secureTextEntry 还是一开始的值,所以此时长按移动光标的功能还是生效的。
因此,要解决这个问题就得让 activeView 的 secureTextEntry 得到更新,并且调用 reloadInputViews 重新绘制键盘。
# 三、动手解决
注:
TextInput.updateConfig该常量在Flutter源码里是早就存在的,但是仅在引擎的Web端使用到,引擎的iOS端则没有使用。
# 1、engine 仓库
FlutterTextInputPlugin.mm
新增 TextInput.updateConfig 常量 kUpdateConfigMethod
   static NSString* const kSetSelectionRectsMethod = @"Scribble.setSelectionRects";
   static NSString* const kStartLiveTextInputMethod = @"TextInput.startLiveTextInput";
+  static NSString* const kUpdateConfigMethod = @"TextInput.updateConfig";
补充处理 TextInput.updateConfig 的方法 updateConfig
 - (void)handleMethodCall:(FlutterMethodCall*)call result:(FlutterResult)result {
  NSString* method = call.method;
  id args = call.arguments;
  if ([method isEqualToString:kShowMethod]) {
  ...
  } else if ([method isEqualToString:kStartLiveTextInputMethod]) {
    [self startLiveTextInput];
    result(nil);
+  } else if ([method isEqualToString:kUpdateConfigMethod]) {
+    [self updateConfig:args];
+    result(nil);
  } else {
    result(FlutterMethodNotImplemented);
  }
更新 secureTextEntry 并调用 reloadInputViews 方法
+  - (void)updateConfig:(NSDictionary*)dictionary {
+    BOOL isSecureTextEntry = [dictionary[kSecureTextEntry] boolValue];
+    for (UIView* view in self.textInputViews) {
+      if ([view isKindOfClass:[FlutterTextInputView class]]) {
+        FlutterTextInputView* inputView = (FlutterTextInputView*)view;
+        // The feature of holding and draging spacebar to move cursor is affected by
+        // secureTextEntry, so when obscureText is updated, we need to update secureTextEntry
+        // and call reloadInputViews.
+        // https://github.com/flutter/flutter/issues/122139
+        if (inputView.isSecureTextEntry != isSecureTextEntry) {
+          inputView.secureTextEntry = isSecureTextEntry;
+          [inputView reloadInputViews];
+        }
+      }
+    }
+  }
# 2、flutter 仓库
editable_text.dart
  @override
  void didUpdateWidget(EditableText oldWidget) {
    super.didUpdateWidget(oldWidget);
    ...

+     if (_hasInputConnection) {
+       if (oldWidget.obscureText != widget.obscureText) {
+         _textInputConnection!.updateConfig(_effectiveAutofillClient.textInputConfiguration);
+       }
+     }
    ...
  }
这样就修复好了,别忘了先执行 ninja -C ios_debug_unopt 进行编译,然后再进行调试验证。
经过调试,一切正常,接下来就是提交 PR 了吗?不,要先添加单元测试,不过具体的单测代码不是重点,所以这里只说明如何去跑单测。
# 四、单元测试
跑单元测试前需先执行如下命令,确保你的 engine/src/out 目录下文件齐全
# engine/src/flutter/tools

./gn --unoptimized
./gn --ios --unoptimized
./gn --ios --simulator --unoptimized
# engine/src/out

ninja -C host_debug_unopt &&
ninja -C ios_debug_unopt &&
ninja -C ios_debug_sim_unopt
# 1、脚本跑单测
注: 请提前打开
iOS模拟器,执行run_tests.py跑单元测试时需要用到
跑脚本单元测试,执行如下命令即可
# engine/src/flutter/testing

./run_tests.py --type=objc
如果报错了,则按其提示先执行相应的命令,完成后再继续执行 run_tests.py
比如这是我执行脚本后的报错内容
➜  testing git:(main) ./run_tests.py --type=objc
Traceback (most recent call last):
  File "/Users/lxf/Desktop/LXF/engine/src/flutter/testing/./run_tests.py", line 1150, in <module>
    sys.exit(main())
  File "/Users/lxf/Desktop/LXF/engine/src/flutter/testing/./run_tests.py", line 1136, in main
    run_objc_tests(args.ios_variant, args.objc_filter)
  File "/Users/lxf/Desktop/LXF/engine/src/flutter/testing/./run_tests.py", line 682, in run_objc_tests
    ensure_ios_tests_are_built(ios_out_dir)
  File "/Users/lxf/Desktop/LXF/engine/src/flutter/testing/./run_tests.py", line 585, in ensure_ios_tests_are_built
    assert os.path.exists(tmp_out_dir
AssertionError: /Users/lxf/Desktop/LXF/engine/src/out/ios_debug_sim_unopt or /Users/lxf/Desktop/LXF/engine/src/out/ios_debug_sim_unopt/libios_test_flutter.dylib doesn't exist. Please run the following commands:
gn --ios --unoptimized --runtime-mode=debug --no-lto --simulator
autoninja -C /Users/lxf/Desktop/LXF/engine/src/out/ios_debug_sim_unopt ios_test_flutter
其实主要原因看这句提示:
engine/src/out/ios_debug_sim_unopt/libios_test_flutter.dylib doesn't exist
所以我们需要进入到 engine/src/out 目录下执行如下命令即可
autoninja -C /Users/lxf/Desktop/LXF/engine/src/out/ios_debug_sim_unopt ios_test_flutter
执行完 run_tests.py 会自动打开名为 IosUnitTestsSimulator 的模拟器(该模拟器是以 iPhone 11 为原型创建的),然后终端会跟随打印单测的执行日志
** TEST SUCCEEDED **

...

Command run successfully in 0.46 seconds: xcrun simctl delete IosUnitTestsSimulator
最终输出 TEST SUCCEEDED 表示单测全部通过。
# 2、Xcode 跑单测
接下来介绍一下 Xcode 跑单元测试,我们用 Xcode 打开 engine/src/flutter/testing/ios/IosUnitTests/IosUnitTests.xcodeproj
打开后你会发现单测只有 FlutterChannelsTest

别急,按 cmd + u 跑一遍就全出来了
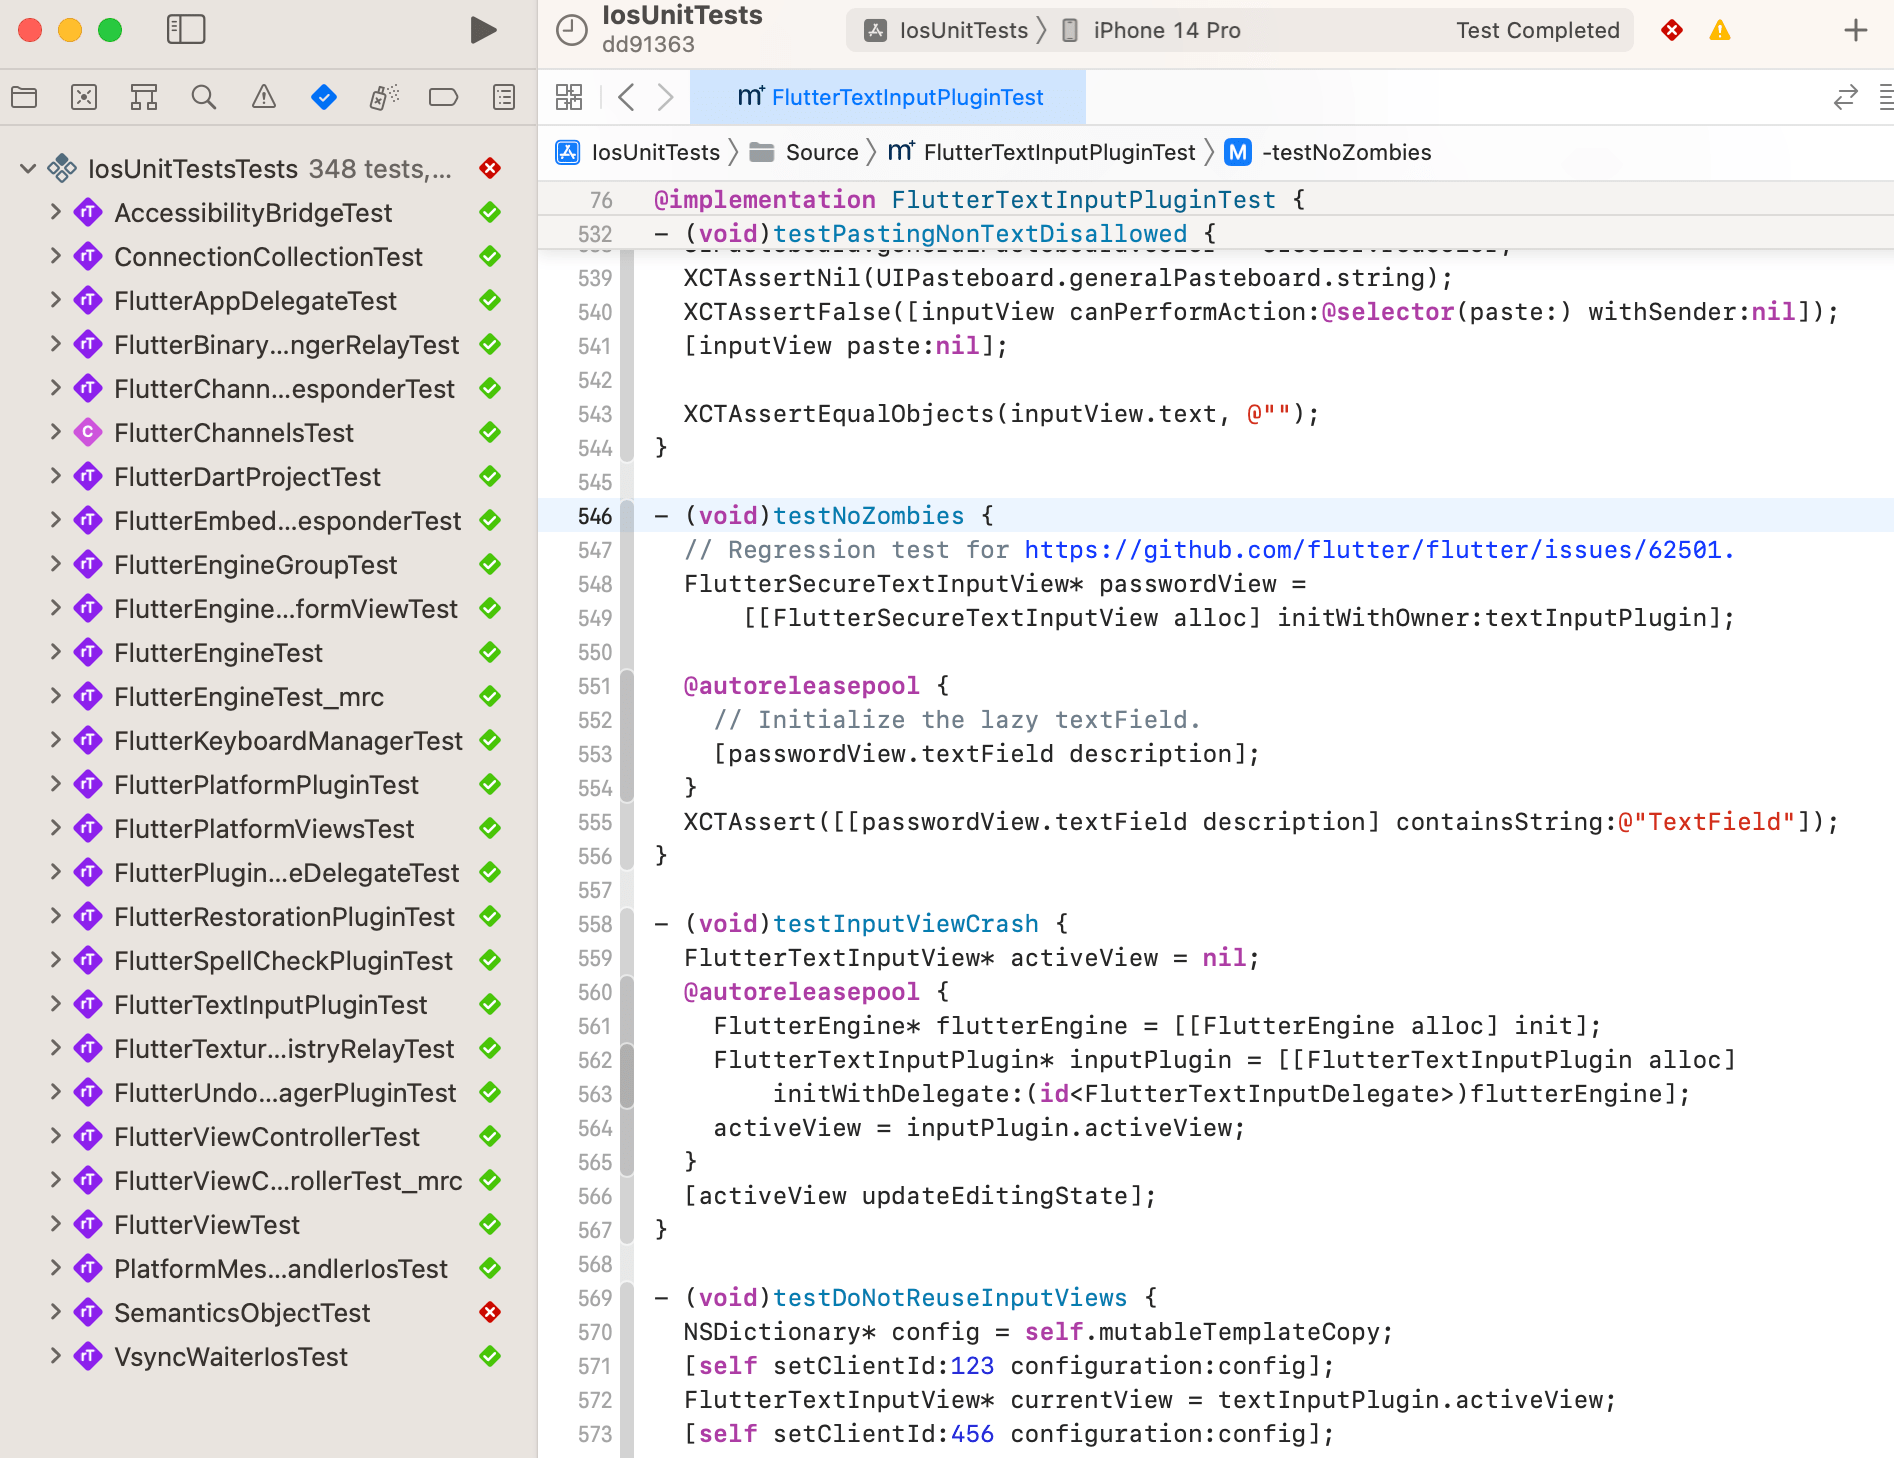
没错,细心的你会发现截图里 SemanticsObjectTest 单测失败了,按官方文档的说明,我们需要选择 iPhone 11 模拟器进行单测。
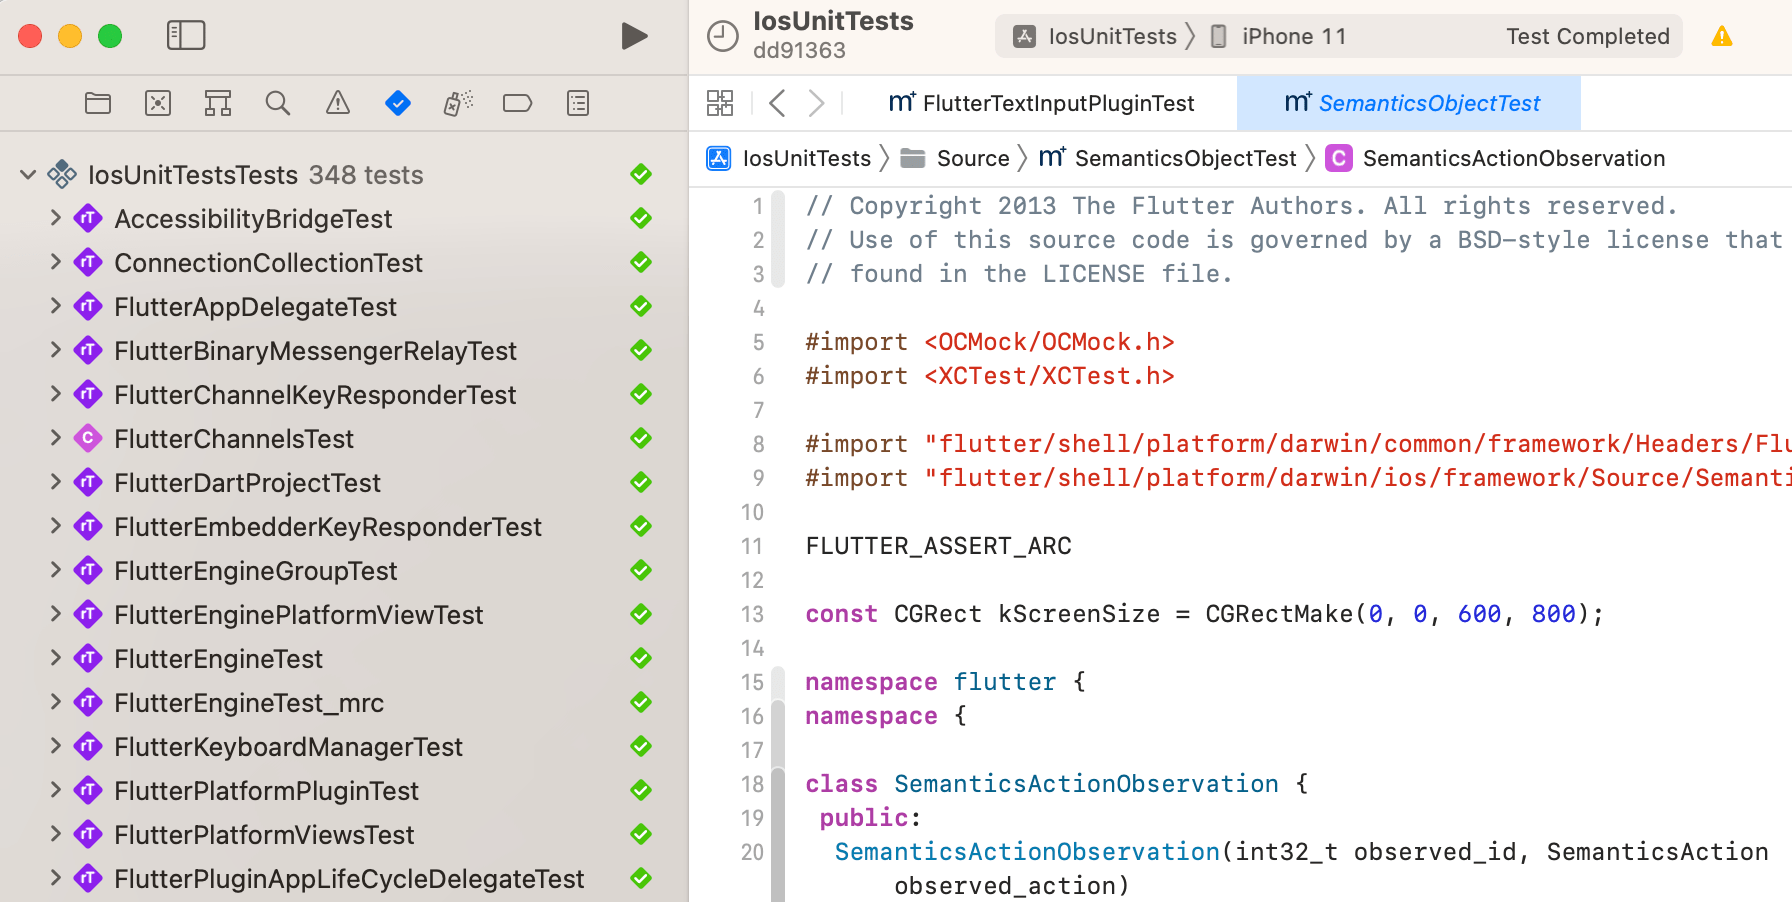
主要原因是下面这行代码过不了,算出来的值不相等
XCTAssertTrue(CGRectEqualToRect(
  scrollView.frame,
  CGRectMake(
    x * effectivelyScale, y * effectivelyScale,
    w * effectivelyScale, h * effectivelyScale
  )
));
运行在 iPhone 11 上的数据
scrollView.frame = (2.5 2.5; 25 50)

float x = 10;
float y = 10;
float w = 100;
float h = 200;
float effectivelyScale = transformScale / screenScale; // 2.5
运行在 iPhone 14 Pro 上的数据
scrollView.frame = (1.66667 1.66667; 16.6667 33.3333)

float x = 10;
float y = 10;
float w = 100;
float h = 200;
float effectivelyScale = transformScale / screenScale; // 0.166666672
这也是为什么 run_tests.py 脚本是以 iPhone 11 为原型创建的 IosUnitTestsSimulator 模拟器。
回归正题,在每一次调整完测试代码后,需要重新执行如下命令重新生成 ios_test_flutter.dylib,否则你的调整不会生效!
autoninja -C /Users/lxf/Desktop/LXF/engine/src/out/ios_debug_sim_unopt ios_test_flutter
执行完再 cmd + u 或者单独执行某一条单测。
# 五、提交代码
在提交代码前,先执行 format.sh 进行检查,确保没问题后再提交,有问题则根据提示处理一下代码。
engine/src/flutter/ci/format.sh
好了,到此所有该做的事情都已经做完了,可以打开自己的仓库,点击 Contribute -> Open pull request 去提交 PR 了。
这里放上我的相关 PR 链接:
PR提交时间于2023.03.10,文章完成时间为2023.04.01。
由于我的 PR 与 Flutter 成员目前做的一些修复在代码上有重叠的地方,所以 PR 是否会被合并目前尚未可知。该篇主要记录了结合引擎去调试 flutter bug 到解决和提交代码的整体流程,供大家参考与相互交流。
# 六、资料

- 01
- AI - Antigravity 不认全局 skills 怎么办?03-02
- 02
- AI - 通过 Docker 来安装与访问 OpenClaw02-02
- 03
- FlutterEye - 发现你手机里的 Flutter 应用01-18